|
|
|
|
How to Import Photoshop Files into WPF
Introduction
In a WPF project you often have to deal with assets that are created by a designer. They are often part of Adobe Illustrator or Photoshop files. There are two ways to achieve this goal. You can
- Directly Import Photoshop Files in Expression Blend
This is the most simple approach if you have Expression Blend 3. Drawbacks are, that you can only import vector shapes as Path elements. If you want to add these shapes into the resources, you have to manually extract the geometries.
- Import Photoshop Files in Expression Design and Export to XAML
This approach requires Expression Design to be installed but works already with Version 2.0. The workflow is a bit more complex, but you can choose if you want to export your shapes as Paths or Geometries.
Preparing the Photoshop File
If you create graphical assets that should be integrated to a WPF project you should think of the following rules to make the import easier.
- Combine multiple vector shapes to one shape
- Don't use layer effects, because they are mostly ignored by the converter
- Set the color dept to 8Bit. Higher color depts cause errors on import
Directly Import Photoshop Files in Expression Blend
The following tutorial explains how to directly import an Adobe Photoshop file into WPF.
- 1. Start Expression Blend and open an empty WPF project
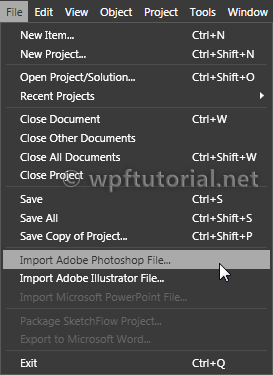
- 2. Choose "Import Adobe Photoshop File..." from the "File" menu.
- 3. Select the file you want to import to Blend
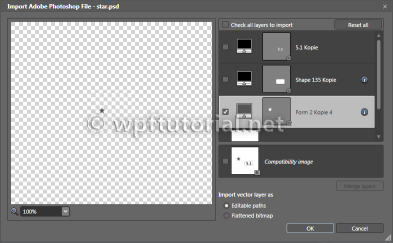
- 4. Check or uncheck the layers you want to import and click [OK].
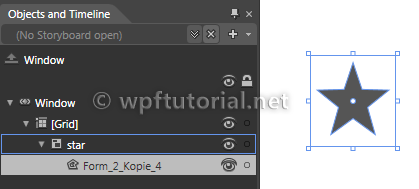
- 5. Blend imports the file now. Each layer will create a new
Image or Path element. The images will automatically be added to a separate folder in your project.
How to convert Path to Resources
To convert imported Path objects to Geometry objects that can be consumes as resources you have to do the following steps:
- 1. Copy the content of the "Data" attribute to the clipboard

- 2. Create a
StreamGeometry object and paste the content between the opening and closing tag. Give the geometry a unique key.

Import Photoshop Files in Expression Design and Export to XAML
The following tutorial explains how to import Adobe Photoshop Files in Expression Design and Export to XAML to use it in Expression Blend.
- 1. Start Expression Blend and open the desired Photoshop File
- 2. Check or uncheck the layers you want to import and click [OK].
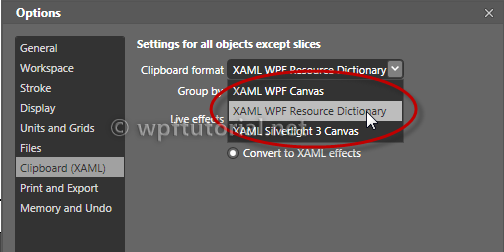
- 3. Open the Options Dialog in "Edit->Options->Clipboard(XAML)" and choose if you want to export shapes as
Canvas or Resource Dictionaries.
- 4. Select the objects you want to export and choose "Copy XAML" in the Edit menu.
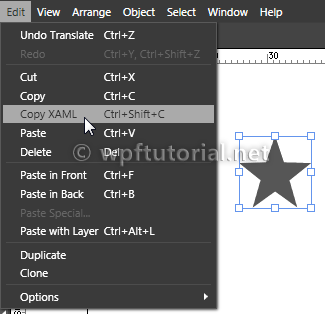
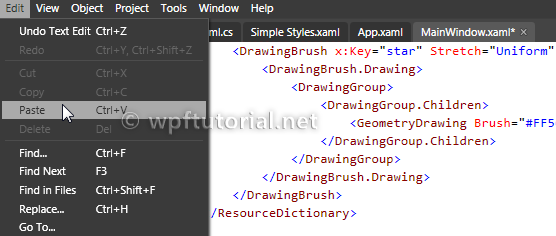
- 5. Go back to Expression Blend andpPaste the XAML snippet from the clipboard.
Last modified: 2009-09-15 21:30:08
Copyright (c) by Christian Moser, 2011.
 Comments on this article Comments on this article
Show all comments
 |
| Jeffrey | |
|
| Commented on 15.September 2009 |
| Again, your tutorials are imbued with visuals making it extremely easy to read and understand. Excellent work!
|
|
|
|
| Pandiarajan | |
|
| Commented on 24.March 2010 |
| Hi You are amazing keep your good work...
|
|
|
|
| satish v | |
|
| Commented on 22.July 2010 |
| nice work
|
|
|
|
| Christian | |
|
| Commented on 23.August 2010 |
| Its funny that you guys find my articles so helpful considering I just copy and pasted random shit from other random sites that I found. Its all good though because those google ads are making me cash!!!
|
|
|
|
| Jake | |
|
| Commented on 10.November 2010 |
| You really just copyed this haha?
|
|
|
|
| anoop | |
|
| Commented on 8.February 2011 |
| hi mose, whether you copied it or not, that does not matter, but it is helping others or not, that matters, and of course these are very helpful.
|
|
|
|
|

|
 Share...
 Feed
About Christian Moser
Feed
About Christian Moser
